

Dirt bike goggles are an essential piece of equipment for any off-road rider. They protect your eyes from dirt, debris, and other hazards that can cause serious injury. However, over time, dirt and grime can accumulate on the lenses, affecting your vision and compromising your safety. To ensure optimal performance and longevity of your goggles, it's important to clean them regularly. Follow these 3 easy steps to properly clean your dirt bike goggles:
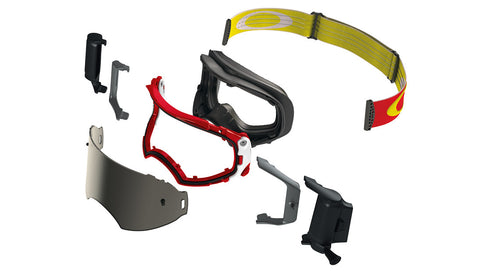
Dismantle Goggles:
Begin by removing the lens and roll-off system from the goggle frame. This disassembly allows for a thorough cleaning of all components.
Laundry Garment Bag:
Place the disassembled goggles inside a laundry garment bag. Include them in the wash with your riding gear, ensuring the washing machine is set to a gentle cycle. This safeguards the goggles from damage during the cleaning process.
Gentle Wash:
Goggle lenses have delicate coatings on both sides to enhance vision and reduce fogging. Avoid harsh chemicals like 'Windex' that contain ammonia, as they can make the lens brittle over time. Instead, use a mild soap with warm water. If mud is present, allow the water to soak and loosen it before gently cleaning the lens with a microfiber cloth or the goggle bag.
By following these 3 steps for cleaning dirt bike goggles, you can ensure clear vision and maximum safety on your off-road adventures. Remember, a clean pair of goggles is a reliable pair of goggles!
Pro Tips: Keep Your Motocross Goggles in Prime Condition
Always have a tear-off in play
Ensure you're running at least one tear-off, even on scorching, dry days with minimal track activity. Adding this extra layer of protection to your goggle lens enhances its lifespan.
Prepare for mud encounters
Arm yourself with an ample supply of tear-offs on muddy days to prevent vision obstruction. For exceptionally muddy conditions, consider investing in a roll-off system, readily available from major motocross goggle brands. These systems ensure clearer vision for an extended period, emphasizing the importance of goggle preparation on muddier or sandier days.
Installing a goggle lens
Goggle lens installation methods vary: Premium goggles often feature a brand-specific quick-release system, while entry-level options may stick to a more traditional lens system. If your goggle boasts a quick-release mechanism, consult the included instructions for specific details on removal and installation.
How to Install Tear-Offs:
Installing tear-offs is a straightforward process that begins with ensuring your goggles are clean and free of sand or moisture on the lens.
Step 1 - Placing Tear-Off on Goggles:
Align the holes in the tear-off with the tear-off posts on the goggles. Gently push the tear-off onto the lens, making sure the pulling tab is on the left-hand side. Many goggles have an additional post on the outrigger or strap, which the tear-off should also press onto.
Step 2 - Stacking Multiple Tear-Offs:
When stacking multiple tear-offs, repeat the above process for each tear-off. Fold back the pulling tab and lock it onto either the post on the lens or outrigger with the tear-off above it. This must be done before adding each tear-off. For laminated tear-offs, the entire stack can be pushed onto the tear-off posts, but ensure the pulling tabs are folded and locked in by the tear-off above on the outrigger or strap post for each one.
How to Prepare and Install Roll-Offs:
Getting your motocross goggles' roll-off system ready for riding and racing is a straightforward process. Following these steps will guarantee a clear lens and prevent issues on the track or trail.
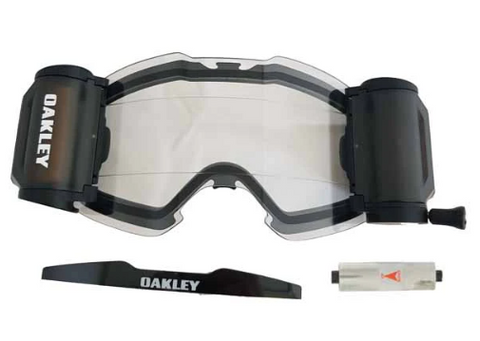
Step 1 - Preparation:
Begin by ensuring your MX goggles and the roll-off system are clean. This is crucial, as any dirt entering the roll-off system can lead to failure. Thoroughly clean the goggles, lens, and roll-off system before riding, making sure everything is dry.
Step 2 - Assembly:
Assemble the roll-off system. If your goggles are clean, you may have already removed the roll-off system. Double-check that no dirt has entered the system during assembly by blowing into the canisters using your mouth or an air compressor.
Step 3 - Installing the Roll:
Install the roll. For a new roll of film, attach the sticky tab to the 'dirty' roll on the other side. If there's enough film left on the used roll, cut it where it's clean and tape it to the dirty side. Lock the film in place once attached.
Step 4 - Installing the Mud-Flap:
For a new roll-off set, install the mud-flap. Align it on the top of the lens where it meets the goggle frame and apply it. Ensure the film sits neatly underneath, or if the mud-flap is already installed, verify the film's positioning.
Step 5 - Finishing Up:
Complete the process by putting on each canister cover and testing the system. Pull the roll-off string multiple times, ensuring smooth retraction and scrolling of the film without crinkling or catching. If any issues arise, repeat the steps. If the system works seamlessly, you're ready to hit the ride!